Getting Started
This walkthrough turns a normal scene into a PS1-style render in a few minutes. Everything happens from the RetroRender panel — open it with Tools → RetroRender.
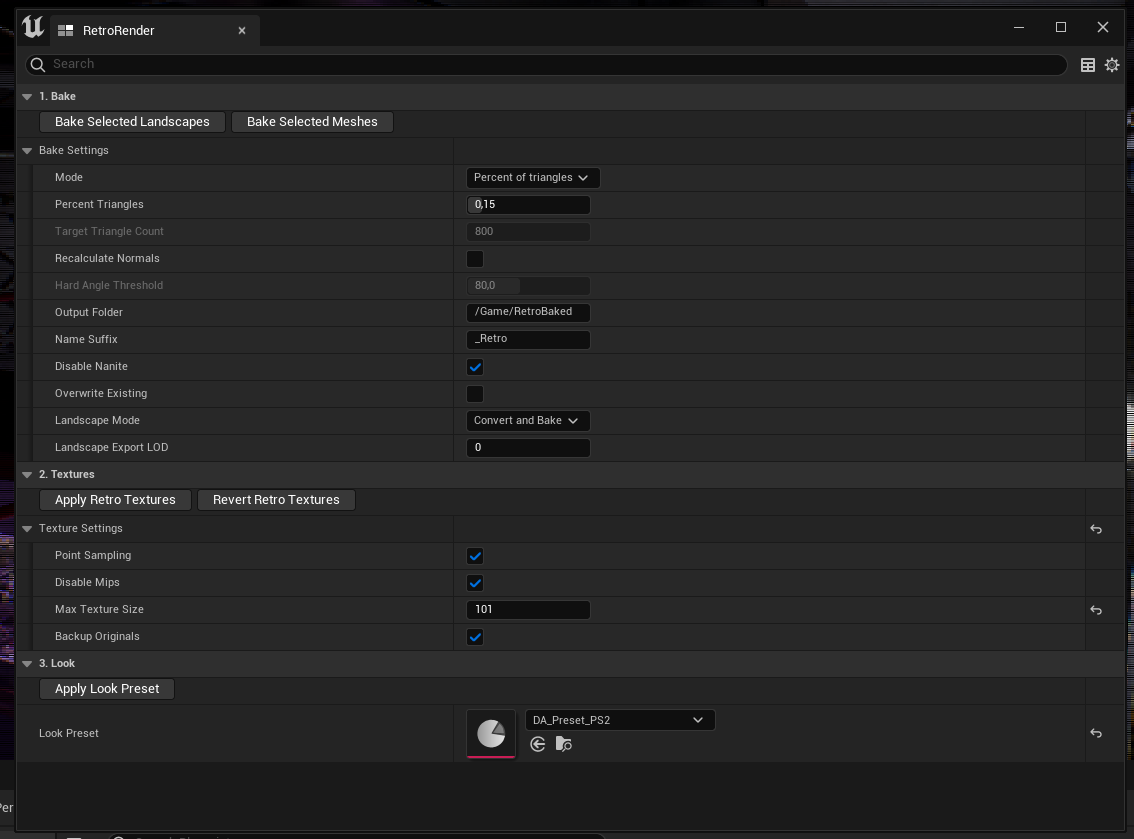
The panel has three tabs that map to the three pillars. You can use them in any order, but this is the recommended flow.
1. Enable the look (post-process)
The look is a post-process material driven by a Material Parameter Collection.
- Add a Post Process Volume to your level (or use the global one), and enable Infinite Extent (Unbound).
- Under Post Process Materials, add an entry and assign
PP_Retro(in/RetroRender/Materials/PostProcess). - In the RetroRender panel, open the Look tab, set Look Preset to
DA_Preset_PS1, and click Apply Look Preset.
The viewport should immediately become pixelated, with reduced colors and dithering. See Retro Look for what each parameter does.
Apply Look Preset pushes the preset's values into MPC_Retro. Every material that reads the collection (the post-process and the masters) updates live.
2. Bake low-poly meshes
Give your meshes the chunky PS1 silhouette by reducing their triangle count.
- Select one or more Static Meshes in the Content Browser.
- In the panel, open the Bake tab.
- Choose a Mode:
- Percent of triangles — keep a fraction (e.g.
0.15= 15%). - Target triangle count — aim for a fixed budget (e.g.
800).
- Percent of triangles — keep a fraction (e.g.
- Click Bake Selected Meshes.
New assets appear in /Game/RetroBaked with the _Retro suffix, reusing the original materials. See Decimate Baker for details.
The baked mesh keeps the same shape as the source — it just has fewer triangles. That is the point: a low-poly silhouette with the original materials.
3. Retro-fy the textures
Make textures crisp and low-res like the era.
- Select textures in the Content Browser.
- Open the Textures tab, keep Point Sampling, Disable Mips and a Max Texture Size of 256 (adjust to taste).
- Click Apply Retro Textures.
Textures become sharp and pixelated. Changed your mind? Select them again and click Revert Retro Textures. See Texture Utility.
Result
- Geometry: low-poly (Baker)
- Textures: point-sampled, low-res (Texture Utility)
- Image: pixelated, color-reduced, dithered, optional scanlines (Look)
Swap presets any time from the Look tab to jump between PS1, N64, PS2 and CRT.